Ya está disponible la documentación de AL3D en: http://angelluispg.es/AL3D/doc/ y el código se puede consultar en: https://github.com/RdlP/AL3D
AL3D is a library to render 3D scenes in the Web. It uses WebGL as low end technology. AL3D include a 3D library called AL3D, but also include a complete Math library called ALMath and a physics library called ALPhysics.
How to build AL3D
AL3D uses a custom build system to build the full and minify library, and also to generate the documentation.
The source is in the src folder, divided into ALMath and AL3D. In the root threre is a build.py. To build the library you need to run this script
python build.py
or
chmod +x build.py
./build.py
If you run the script without argument the build system will build the full and minify library in the dist folder. If you want to copy the sources outside dist folder you can run the script as follow:
python build.py --move_source_to=..
If you want to generate the doc you can use:
python build.py --generate_doc
The doc is generated in a doc directory in the script folder. If you can generate the documentation in a folder named dir you can use:
python build.py --generate_doc --output_doc_dir=dir
Basics Classes
AL3D has a basics classes that are needed in order to render a simple scene. These classes are:
These classes are mandatory in order to render a scene. You can delcare it as follow
var renderer = new AL3D.Renderer(window.innerWidth,window.innerHeight);
var camera = new AL3D.PerspectiveCamera(40, window.innerWidth/window.innerHeight);
var scene = new AL3D.Scene();
Renderer
The Renderer class is the responsable for render the scene, you need to pass it the width and height of the viewport, if you want a render that fill the browser you can pass window.innerWidth and window.innerHeight for width and height respectively. To render the scene you need to tell it to the render as follow: renderer.render(scene, camera);
In order to see the render in the webpage you need to retrieve the dom element from Renderer class and insert it in the html page. You can use the following code
document.getElementById("canvas").appendChild(renderer.getDomElement());
Camera
The camera is the object that you use to see the 3D world. It is your eyes. The Camera class is an abstract class. You need instantiate a PerspectiveCamera or OrthographicCamera
The constructor for PerspectiveCamera is:
AL3D.PerspectiveCamera = function(fov, aspect, near, far)
Where fov is the angle of the frustum, aspect is the aspect ratio and near and far are the near and far plane for the frustum.
The default values for the parameters are:
fov = 40aspect = 1near = 0.1far = 1000
On the other hand the constructor for OrthographicCamera is:
AL3D.OrthographicCamera = function(left, right, top, bottom, near, far)
Where left, right, top, bottom, near and far are the planes for the frustum and has no default values.
Scene
The Scene object is the responsible for store all objects that must be rendered. You can add AL3D.Object3D to the scene. AL3D.Object3D is an abstract class from which all renderable object inherit. The following classes are classes that inherit from AL3D.Object3D and are instantiables.
PointLightDirectionaLightSpotLightAmbientLightMeshOrthographicCameraPerspectiveCamera
And here are other abstracts classes that also inherit from AL3D.Object3D.
You can easily add objects to the scene with the add scene function.
scene.add(mesh);
Other important classes
Apart from the previous classes, AL3D has other importants classes
Mesh class allows you to render meshes.Material classes allows to add properties surfaces to the meshesLight classe allows you to add lights to the scene.
Mesh
Mesh class allows you to render meshes. You can use the mesh constructor to create a mesh. When you use the constructor you need pass the vertices, indices of the mesh and other important parameters such as normals, uv, and material.
var mesh = new AL3D.Mesh({vertices : [], indices : [], uv : [], normals : [], material : material});
and then you can add it to the scene.
scene.add(mesh);
In most cases you will not use this method.
You can create a basics primitives with static mesh method.
var sphere = AL3D.Mesh.createSphere({radius : 1, material : material});
var cylinder = AL3D.Mesh.createCylinder({radius : 1, height: 2 material : material});
var cone = AL3D.Mesh.createCone({radius : 1, height : 2, material : material});
var circle = AL3D.Mesh.createCircle({radius : 1, resolution : 20, material : material});
var cube = AL3D.Mesh.createCube({size : 1, material : material});
var plane = AL3D.Mesh.createPlane({size : 1, material : material});
Also, you can load a model from a json model. To export models from blender you need a plugin that transform blender model to json model.
AL3D.Utils.loadModel({model : "suzanne.json"}, function(mesh){
mesh.setMaterial(new AL3D.BlinnMaterial({shininess : 128, diffuse : 0xFFAAAAAA, specular : 0xffffffff, shading : AL3D.PhongInterpolation}));
mesh.position = new ALMath.Vector3(-0.9,-0.3,-2);
mesh.orientation.x = -20;
mesh.scale = new ALMath.Vector3(0.28,0.28,0.28);
scene.add(mesh);
renderer.needUpdate = true;
})
Material
Materials classes give surface properties to meshes, for example, a material can determine the amount of light that mesh absorbs, the color of the mesh, if the mesh is afected by the light etc.
AL3D has many differents materials classes. AL3D.Material is an abstract class from which inherit the following classes
BasicMaterial. With this material the mesh is not affected by the lightLambertMaterial. With this material the mesh gets diffuse componentBlinnMaterial With this material the mesh gets diffuse and specular componentsPhongMaterial. With this material the mesh gets diffuse and specular components.TonnMaterial. With this material the mesh gets a toon aspect.
The abstract class material constructor is
AL3D.Material = function(p);
Where p is and object that can contains the following properties
texture to specify a color mapvideo to use video as a texturespecularMap to specify a specular mapnormalMap to specify a normal map
Please refer to the API documentation to the other material parameters.
For example, to create a BlinnMaterial you can do the following
var material = new AL3D.BlinnMaterial({shininess : 128, diffuse : 0xFFAAAAAA, specular : 0xffffffff, shading : AL3D.PhongInterpolation});
mesh.setMaterial(material);
Lights
Lights are nedeed to give a realistic result. The lights will interact with the materials added to the meshes, but remember that BasicMaterial is not affected by lights.
AL3D has a couple of lights. Light is a abstract class from which inherit the following classes:
PointLightDirectionalLightAmbientLightSpotLight
Please, refer to the API documentation to learn how to use ligths.
Lights inherit from Object3D so, you can add it to the scene
scene.add(light);
Basic example
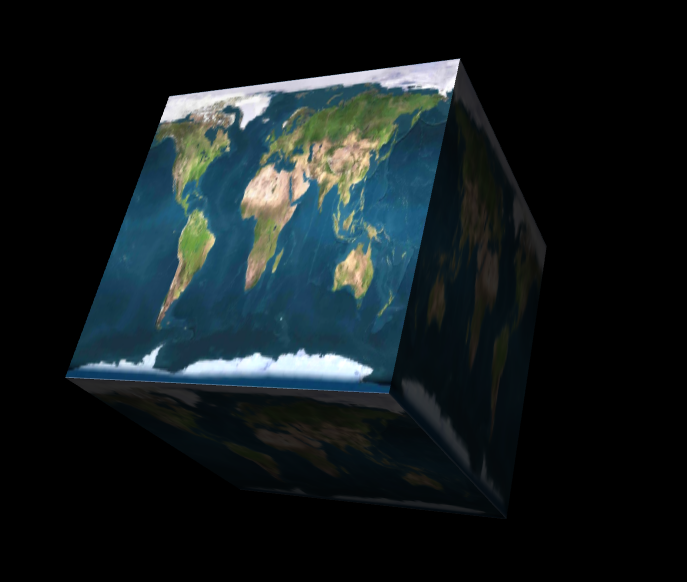
In this example we are going to create a rotating cube in the center of screen with a color map.
This is the javascript code
var renderer, scene, camera;
var cube;

var main = function(){
var init = function(){
renderer = new AL3D.Renderer(window.innerWidth,window.innerHeight);
camera = new AL3D.PerspectiveCamera(40, window.innerWidth/window.innerHeight);
scene = new AL3D.Scene();

var cubeMaterial = cubeMaterial = new AL3D.BlinnMaterial({shininess : 128, diffuse : 0xFFAAAAAA, specular : 0xffffffff, shading : AL3D.PhongInterpolation,  texture: 'earth-tex.jpg'});
cube = new AL3D.Mesh.createCube({size: 2, material : cubeMaterial});
cube.position = new ALMath.Vector3(0,0,-3);
var pointLight = new AL3D.PointLight({color : 0xFFFFFFFF, intensity : 1, position :  new ALMath.Vector3(0,0,0)});
var directionalLight = new AL3D.DirectionalLight({color : 0xFFFFFFFF, intensity : 2, position :  new ALMath.Vector3(0,1,0)});

scene.add(cube);
scene.add(directionalLight);
scene.add(pointLight);

document.getElementById("canvas").appendChild(renderer.getDomElement());
};

var animate = function(){
cube.orientation.x = (cube.orientation.x+0.005)%360;
cube.orientation.y = (cube.orientation.y+0.005)%360;
renderer.render(scene, camera);
window.requestAnimationFrame(animate);
};

init();
animate();
}
And this is the html code
<!DOCTYPE html>
<html>
<head>
<title>AL3D Demo - Basic Example</title>
<meta charset='utf-8'/>
<script type="text/javascript" src="AL3D.js"></script>
<script type="text/javascript" src="app.js"></script>
</head>
<body onload="main()">
<div id="canvas"></div>
</body>
</html>
The result is


